Archives
Graduation Cake Pops
 This past weekend, one of our dearest friends’ daughter, Jodi, graduated from Groveport Madison High School. She made a special request to have cake pops for her graduation party. I had a lot of fun creating a unique design. While I worked on making confectionary joy, her mom, Beth, worked on building a unique tower to display the cake pops. Beth cut up scrap wood she had that were 1 x 4s into different lengths and stacked them in a very unique pyramid pattern. Half the wood was white and the other half black. The cake pop tower turned out awesome!
I have posted how to make cake pops on my blog before HERE, HERE and HERE. Check out those links for specific directions. I don’t use those “cake pop pans,” instead they are all rolled by hand. I take great pride in making yummy cake pops and they always get rave reviews. Seriously though, you really can’t screw them up. They are simple to make, it just takes a lot of time and patience.
Since her graduation party was outdoors and the weather had been warming up, I decided to make the cake pops upside down. I am so glad I did! If I would have made them with the cake ball on top (like a lollipop), they most certainly would have turned into the ball at Times Square on New Year’s Eve! The balls would have dropped all the way to the bottom of the stick after softening up in the warm weather!
I placed mini cupcake liners in my mini cupcake pan. Instead of sticking the dipped cake ball into my styrofoam block to set up, I instead placed the freshly dipped cake ball (on the stick) into the mini cupcake liner. I let the candy “set up” in the mini cupcake pan. Once the candy had hardened, I melted some more white candy melts and poured it into a Wilton squeeze bottle. I drizzled the melted candy on top and then sprinkled red sugar crystals on top. The red crystals only stuck to the freshly melted candy. I turned the mini muffin liner upside down and let the excess red crystals fall back into a bowl. The school colors are black and red and I wanted the cake pops to represent that. The designer mini cupcake liners were purchased at Michaels.
While at Michaels, I picked up some red scrapbook paper with white polka dots. I printed out Jodi’s name & class of 2013 along with “Way 2 Go” in a table. I then hand cut out the mini flags. I printed it so that I could fold it over and there would be writing on both sides of the mini flags. I used double-sided tape to tape the flag sides to each other around the lollipop stick and then cut a little “V” out of the edge. HERE is the Word table I used. I changed the table’s lines to a light gray color so that it wouldn’t show up as much if I should happen to not cut in a straight line (I’m known for doing that, lol). You can just highlight what was typed and type over it using your own sayings/words in its place. They really turned out super cute!
Just also wanted to add a cute idea on how to display a graduation cap. I took a garden ornament to use as the cap holder. It is a cement looking (probably made of plaster) ball on a large candle stick of sorts. I had purchased it a year or so ago to use as my prop to display the Mickey Mouse crochet hats I make. The graduation cap holder was placed on the table with her photos and other mementos from high school! This was an adorable way to display her graduation cap!
Way to go Jodi!
Best wishes at Ohio University this coming fall!
Update:
I was asked to make more grad cake pops for another Class of 2013 graduate. Dareyl Hamlet is a great kid and I was humbled by his request. I whipped out these ones below for his graduation party! Good luck Dareyl at Shawnee State University!
Update 2:
Made more cake pops for our nephew, Tyler! Tyler graduated from Plymouth High School!
DIY Photo Block Ornaments
 I’ve blogged before how I live life a little different. I do stop and smell the roses everyday. I appreciate the priceless things in life like love and friendship. My family and my friends are my sanctuary. In them I find peace. Peace with being diagnosed with PH. In them I also find hope. Hope for the future no matter how short or long mine may be. I am a very thankful person. I let go of anger as fast as it comes. I tell those who are important to me that I love them ALL the time. I say it because I mean it. Am I this way because of my death sentence diagnosis? No. I really don’t believe that. I have always been a passionate person, if anything, PH has made me even more passionate. I am passionate about living versus just existing. There is a huge difference.
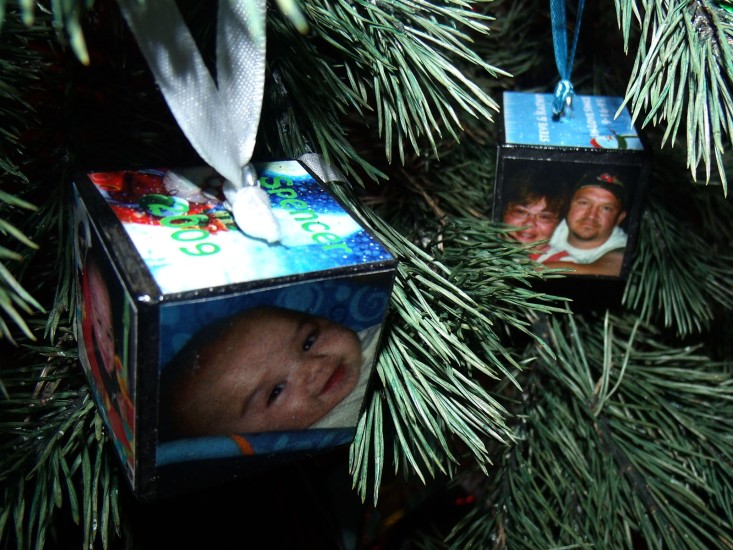
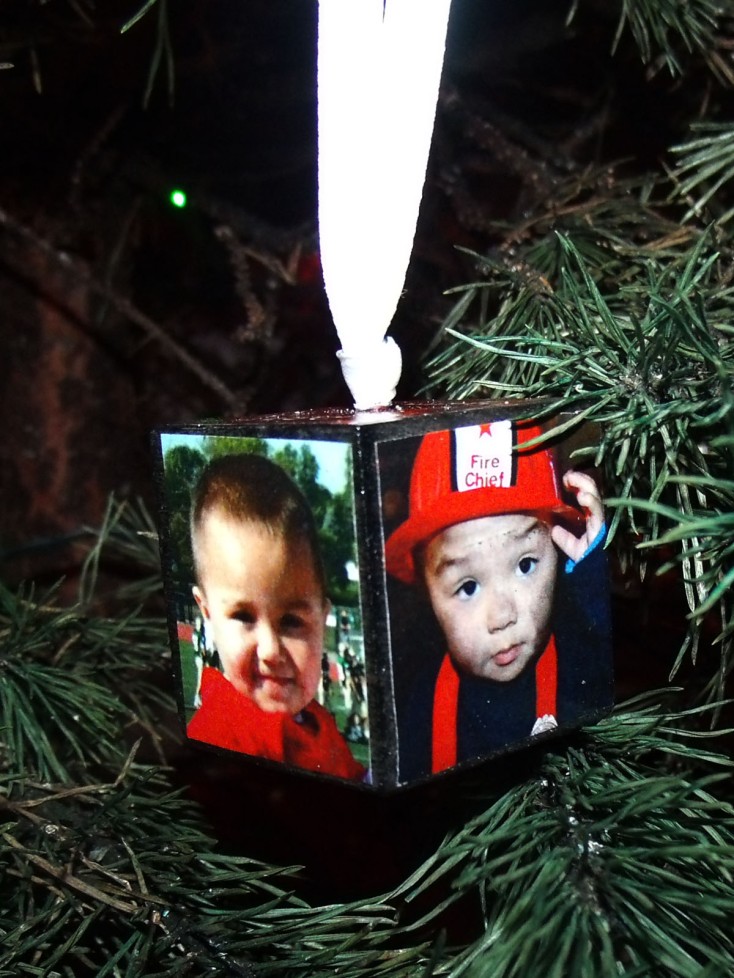
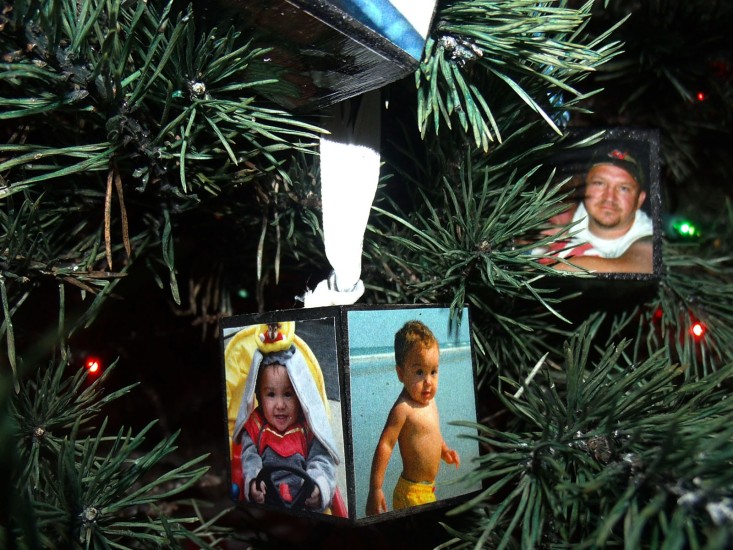
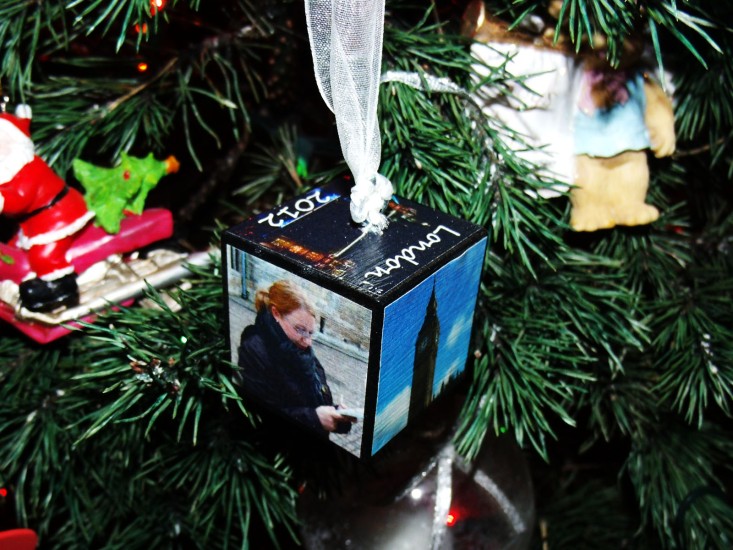
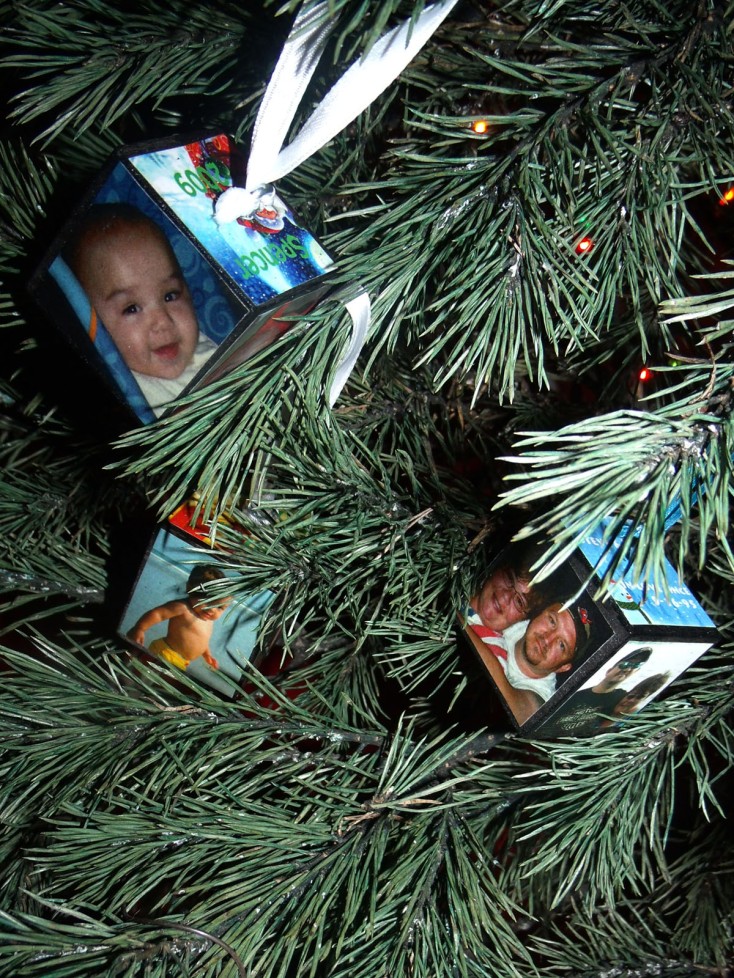
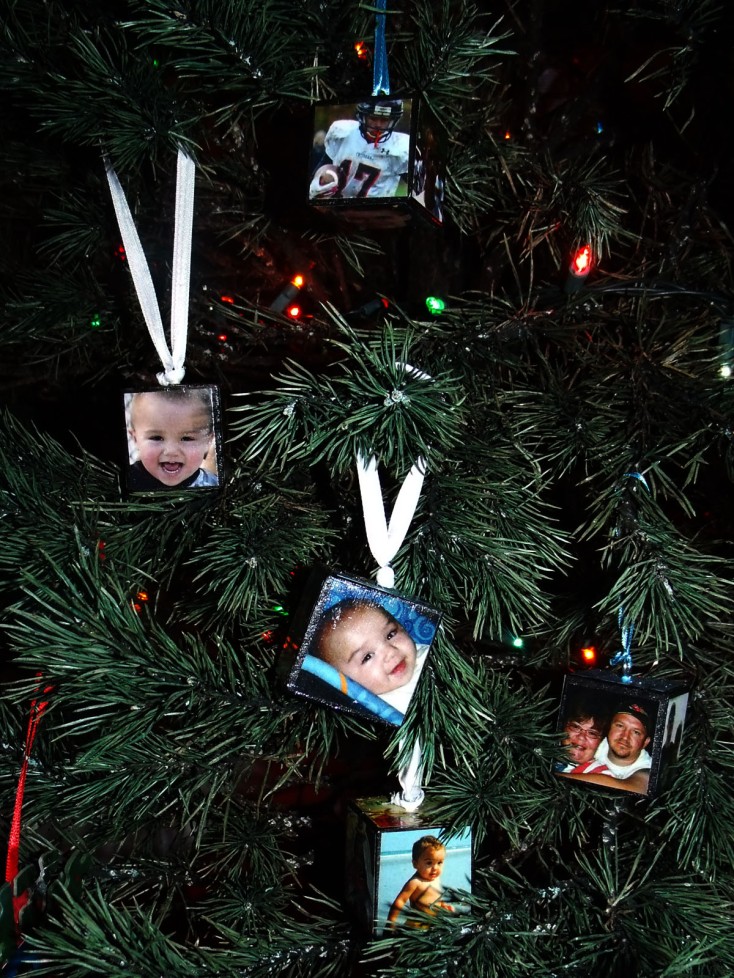
So when birthdays, special occasions or the holidays come around, I don’t run to the nearest mall or megastore looking for perfect gifts. The truth is that we are on a fixed income thanks to my PH. So what I believe my family and friends deserve are things I can’t afford to buy them. So instead, I always try to make something for those I love dearly. I pour all my love into the things I create and I am giving a piece of me when I make something for someone. This past football season, I made large 4×4 wood blocks for each senior that on each side had a different photo of them in action on the field. You can check out how I made the large photo cubes HERE. The kids loved them and they turned out so great. Then it hit me! I can scale back the size and create personalized photo ornaments! This post has written directions but the post with the large 4×4 photo cubes has detailed photos to go with the written directions. I pretty much followed the same steps other than I inserted eyelet screws into these smaller photo block versions to create a hanger.
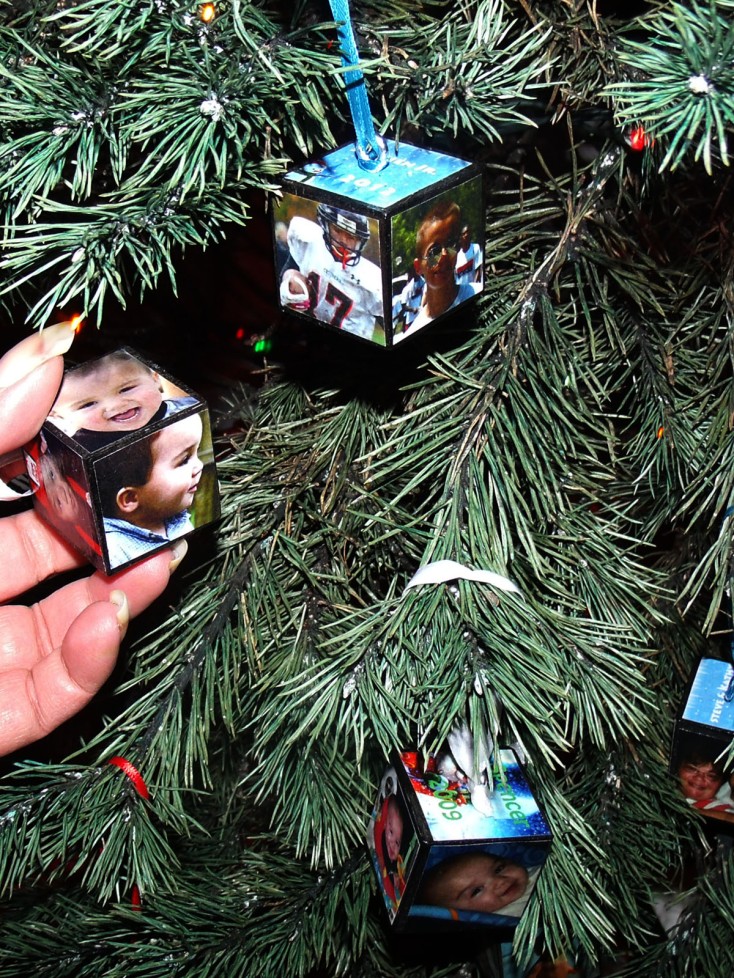
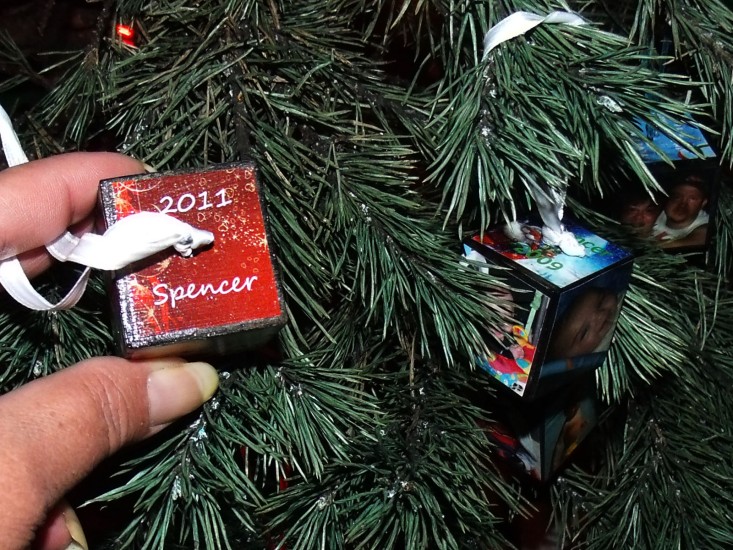
The hard part was gathering memorable photos of my friends and family. Thankfully social websites make this part less daunting. I visited my family’s and friends’ Facebook pages and found 5 special pictures of theirs that I knew were important to them. For the 6th side of the block (the top), I found a wintery background picture (just type “winter wallpaper” in the Google image search bar and you will find tons of graphic backgrounds to choose from). I used a cute snowman picture and added text that said “Our Sweet Snowbabies 2012” or “Our Sweet Grand Snowbabies 2012” or I just put their name with the year on it. I used a photo editing software to crop down the photos into perfect squares.
Then I went to Michaels to find 2×2 wood blocks. They were selling them for $1.29 each! Highway robbery! The hubby took me to Lowes and got a 36 inch 2 x 2 railing banister, eyelet screws (to make the hanging ribbon) and sand paper. He cut a few by hand using a hacksaw and then my dear friend, Rhonda, had her dad cut up the rest. First off, let me tell you, those hardware megastores get away with murder! There is no such thing as a 2 x 2 or 4 x 4. Everything is always at least 1/2 an inch smaller than stated! If the wood is not 2 x 2 then just say that! Sheesh! it’s a good thing those mega hardware stores are geared toward mostly men because if enough women were aware of their cheating ways, there would be a major ruckus! Us women don’t do well with false advertising, lol! After choosing all the photos, I added them to a Word document. I scaled down the size of each picture to 1.5 x 1.5 size. I was able to get several photos onto one sheet of paper. I saved them to a memory stick and took them to the FedEx Kinkos to print them in color using their laser printers. I know from experience that photos printed from my deskjet printer at home doesn’t work well with Mod Podge. The ink runs, smears and ruins the photo. I had the photos printed on plain old copy paper because again from experience, I know it works best to have thin paper when Mod Podging (is that a word? LOL).
Steve sanded down the edges and the freshly cut sides to make them as smooth as possible. Steve then used the black spray paint left over from making the senior photo blocks and spray painted all the 1.5 x 1.5 blocks black. Following the same technique I used for the 4 x 4 blocks (which again were really 3.5 x 3.5 blocks, lol), I cut down the photos just slightly smaller. Each side was slightly different so I laid the block on the photo, traced around it and cut just slightly inside of the square. The black creates a frame around the photos giving it a really cool effect. I applied Mod Podge to the wood block and using an old expired credit card, I smoothed the picture on to the wood block side. I repeated this for all the sides and for all the different blocks I made. I then applied two layers of Mod Podge (glossy) over each photo all the way to the edges of the block (allowing the 1st layer to fully dry before adding the 2nd layer). I hand screwed on the eyelet screws (using the pointed scissor ends inserted into the eye to do the last few tight turns). I then attached a color coordinating ribbon. They turned out so freaking cute!
I decided to go back in time and make one of Spencer for every year we have been blessed to have him. I used a different winter graphic design for every year and always added “Spencer” and the coordinating year to the image on the top of the wood block. I also made sure all words were toward the top or bottom and not in the middle where the eyelet screw would be screwed in. I will continue to make one every year for Spencer choosing 5 photos of importance for that year. When he turns 18, he will have 18 keepsake ornaments! I made one for our oldest son using special photos of him from the past year. There are very few photos in general of Steve & I together. Mostly because I am usually the one taking pictures. I found 5 photos of us taken some time in the past 17 years we have been together. Then on the top block I put “Steve & Kathy” toward the top of the block and “In love since 1995” toward the bottom of the block. I loved how these turned out and am so thankful that I was able to create a gift that is worthy enough to be given to those I love.
These would make for great “Baby’s 1st Christmas” ornaments using 5 baby pictures of that year. Or a fantastic wedding gift using wedding photos. For one of my friends, I used some of her daughter’s senior school pictures. For another friend, I used photos from a loved vacation she had taken with her daughter to London. The possibilities are only limited by your imagination! So get those creative juices flowing! It would be so awesome to have just a tree only decorated in little mirrors and photo blocks! Make some of just specific family members and some of specific vacations! Oh, this will be a future project for sure, a photo cube tree covered in wonderful memories! Because I had black spray paint, ribbon and Mod Podge on hand, the 20+ ornaments cost less than $10 to make. Again, that doesn’t matter, these cutie patooties are priceless gifts made with tons and tons of love!
DIY Photo Cube
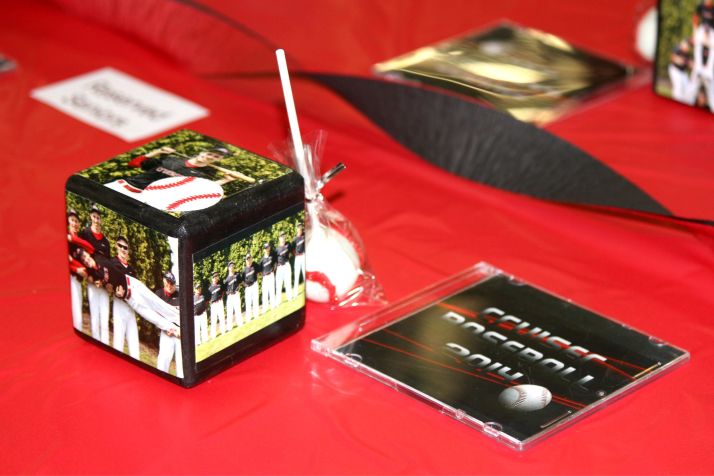
I wanted to make something memorable to give to the senior football players at the end of season banquet. We have taken so many photos of the players throughout the season and I wanted to use those photos . . . so came the Photo Cube! They turned out fantastic! The players loved them and so did everyone else who attended the banquet. They were easy to make and very affordable! I had some help from my dear friends, Rhonda and Beth! I couldn’t have done it without their help! Beth took some of the pictures and Rhonda came through on some of the supplies.
Supplies:
-
4×4 wood blocks
-
Black spray paint
-
6 photos
-
Credit card (or something like a credit card, you probably don’t want to damage a credit card, lol)
-
1″ sponge brush
-
Mod Podge (I used glossy)
Directions:
You can go to any lumber yard or large home improvement store to buy a 4×4 wood post. I was very fortunate that Rhonda’s dad had some leftover posts after making a fence. Cut the wood into an even block. As most folks know, wood posts, planks, etc., are never truly the size they say they are. The are often smaller. So cut the post as close to an even block as you can. Sand down the corners, edges and all the sides. Rhonda’s dad did all the cutting and sanding for me! I couldn’t have made this without his help!
Spray paint the wood block with black paint. I used a cheap can of glossy black paint from the dollar store. Okay, I didn’t use it, the hubby did. He spray painted all the blocks for me ensuring he had an even coat on all six sides.
Print your 4×6 photos on normal copy paper using a laser printer. I of course don’t have one of those at home, I have an inkjet printer (like most folks do). The ink from inkjet printers usually run when any liquid gets on them (including adhesives). Inkjet printers use liquid ink sprayed through microscopic nozzles onto the paper, and laser printers use a toner cartridge (filled with fine powder) and a heated fuser. You can take your pictures to FedEx Kinkos and they will print color on normal paper for under 70 cents a sheet! Again, Rhonda came through and printed my pictures at her work using their laser printer. I also went ahead and cropped my photos down to a 4×4 size and was able to get 4 photos on one 8.5×11 sheet of normal copy paper. I just opened a blank word document and changed the margins to zero. The program auto corrects it to appropriate margins (the smallest margins possible). I then inserted the pictures into the blank document and was able to get 4 photos (4×4 in size) onto one sheet of paper. I recommend cropping your pictures to make it easier to use. Remember, the wood isn’t truly 4×4 in size, it is actually smaller so cropping it to 4×4 size ensures your picture will fit on the wood block.
After the black paint is completely dry, place your block on top of your picture. Using a pen or pencil, outline the block onto your photo. I have the photo upside down drawing on the backside of the photo.
Cut your photo about an 1/8″ inside of the line (so that a little of the black painted wood will become the edge of the photo). You will have to trim each picture this way because again, a 4×4 post is not truly 4×4 in size and your wood block may not be perfectly squared (meaning the sides could be longer than the ends or vice versa).
Using a 1″ sponge brush, brush on a light layer of Mod Podge on one side of the block.
Center your photo on to the block.
Using your credit card, press down the pictures making sure there aren’t any air bubbles and pushing out the excess glue. I used an old bingo card that I didn’t care if it got all scratched up and covered with glue. Allow this to dry for approximately 10 minutes.
Apply a thin layer of Mod Podge with the a sponge brush on the entire side covering over the photo. Don’t panic, it will dry clear and create a glossy finish. Allow to dry for approximately 10 minutes. Apply a second thin layer of Mod Podge. Allow to dry for approximately 10 minutes. Two layers of Mod Podge actually was enough to smooth out the edges of the photo. When you rubbed your finger across, you couldn’t feel the picture sticking out above the block. Repeat all the steps for the remaining 5 sides. After a couple of hours, the photo cube still felt just a tiny bit tacky. I put the photo cube on wax paper and allowed it to dry overnight. It was good to go the next day!
They really turned out beautiful. My picture above isn’t that great thanks to my camera. It has a mind of its own at times but the photos were crisp and glossy even though they don’t look that way in the photo, lol! The blocks don’t have to be perfectly shaped nor do the pictures have to be cut into a perfect square. As with anything home-made, the imperfections make it perfect! This would make a great gift to give to grandparents with the sides filled with photos of their grandchildren! The possibilities are endless and the senior table looked amazing at the banquet with the photo cubes on it!
Spencer’s Sesame Street Birthday Party
Our baby boy, Spencer, turned 3! To celebrate, we rented out a shelter at our local park and had a Sesame Street bash! All the decorations were hand-made. So were the cupcakes & his own special smash cake! This was a very inexpensive themed birthday party! Total cost for 50 goodie bags, 48 cupcakes, 1 smash cake & decorations = approximately $70!
Spencer’s goodie bags turned out fantastic! It was filled with his favorite things: Smarties & crayons. We also included 2 photo magnets of Spencer that we made ourselves. Here’s a great link to how to make these fairly inexpensive magnets: How to Make Magnets. Tip #1: buy a 3/4″ circle punch cutter or you will hate yourself after about 5 picture cutouts! For more tips, check out my post about photo magnets found HERE. Thinking about other ways to package your DIY glass magnets? Check out this post HERE.
To make the goodie bags, I purchased treat bags used for lollipops or suckers (100 count for under $3 at Michael’s). I then made the label using Microsoft Publisher & Microsoft Word and printed it on white cardstock. The size is a standard business card. I created a “tent-fold” so that one side of the goodie bag had the “Thank You” message and the other side had one of my favorite pictures of Spencer on it. I filled the treat bags with 2 magnets, 2 Smarties & 2 crayons. I folded down the treat bags about 1/4″ and then stapled the folded business cards over the bag. All in all, the total cost for 50 goodie bags was around $20.00 (the majority going into the cost of making the magnets)!
A Sesame Street Party is not complete without the “Spencer Street” sign! This was made out of a paper towel cardboard roll, a yellow balloon & a terra cotta pot. Using the computer, I created the “Spencer Street” sign. I laminated the sign to make it more sturdy & also to create an edge to slip into a slit I cut into the carboard role. I just duct-taped the excess laminate to the inside of the cardboard roll! I blew up the yellow balloon (water balloon size) and tied a string to it. I dropped the string down the cardboard roll and pulled it just tight enough so that the balloon was snug against the top of the roll. I then duct-taped the string on the inside at the opposite end of the cardboard roll. I turned over a terra-cotta pot and duct taped the cardboard roll to the pot. I applied several layers of duct tape to ensure the cardboard roll (which is very lightweight) was securely attached to the pot. I took another piece of green cardboard stock and wrapped it around the cardboard roll to hide the duct-tape-work-of-art at the base of the cardboard roll. The cardstock was secured to the cardboard roll by using plain ol’ transparent tape (seam of course was on the back side of the sign post). Next I covered the base with this reflective tape. I don’t know really what it is, lol. Something the hubby got at the home improvement store. It was a bright & shiny silver tape. Silver duct tape would work just as good too! Spencer’s street sign was super easy and it turned out to be a fantastic table centerpiece for the goodie bag table! Total cost: 69 cents for a terra-cotta pot at Walmart, I had the rest of the supplies on hand.
Sesame Street characters are a must for his party! I made tissue balls and applied character faces to it! Really easy to make! I’ve seen online where folks are charging like $10 for each character tissue ball, that is crazy! I made all 8 of these (2 of each one) for less than $6.00!!! I used solid color cardstock to cut out the characters’ faces from. I used all-purpose craft glue to adhere it right onto the tissue balls. The 8 character tissue balls hung from the rafters of the shelter house between balloons…it was really perfect 🙂 Here is a great link on how to make the tissue balls (you will be smacking yourself having not done this before for a party): How to make Tissue Balls.
I made 10 table centerpieces using some supplies I already had on hand! I printed 2 pics of each Sesame Street character (the 2nd pic was a “mirror image” so that the centerpieces were double-sided). I found some old construction paper and glued the characters down to each side. I then glued the characters to a dowel rod that was stuck into a styrofoam cube. I glued down tiny squares of green tissue paper (the old “wrap tissue around eraser end of pencil, dip it in school glue and press the pencil down onto the foam trick”). I adorned each character with some leftover ribbon I had for other projects I had done. These were way cute and now that his party is over, we removed the dowel rods from the terra-cotta pots (oh, which were only 59 cents at Michael’s) and Spencer uses his character pieces as puppets! Total cost for 10 table centerpieces $6.90 (59 cents per pot & $1 for green tissue paper at Hobby Lobby), the rest of the supplies, I had on hand. I’ve had a lot of hits for Sesame Street decorations on my blog. I thought I would add Microsoft Word documents that contains the photos used for the centerpieces. All you have to do is cut out the front and back and put it on construction paper.
Here it is (click on the name and the file should download to your computer): Ernie, Big Bird, Count, Elmo, Oscar, Cookie Monster, Snuffalugasus, Bert & Super Grover.
We provided several character-themed snacks for the party guests! This was a tray of “Grover’s Grapillars”! I skewered 5 green grapes sideways and applied melted chocolate eyes (dipped the blunt end of a skewer into the chocolate and daubed the eyes onto the grape). I also purchased 240 small condiment cups at GFS for less than $4. In front of each of the snacks, I had printed a picture of the Sesame Character on a sign saying what the snack was:
- Small cups filled with sunflower seeds for “Big Bird’s Seeds”
- Small cups filled with pretzel sticks for “Count’s Sticks”
- Small cups filled with cookies for “Cookie Monster’s Cookies”
- Small cups filled with gummi worms for “Oscar’s Worms”
- Small cups filled with goldfish crackers for “Elmo’s Goldie Fish”
Here are printable signs that you can put in front of the treats. There are two signs per Word document. You can fold to create a tent-fold and also a fold across the bottom (so if looking from the side, you created a tall triangle) making it easy to stand up and tape to your table. Serving Signs 1, Serving Signs 2 & Serving Signs 3.
Wish the picture turned out better! The Popcorn Cupcakes were a huge hit! It’s not really popcorn but mini-marshmallows cut up to look like popcorn!
It was really simple to make these Popcorn Cupcakes! First you have to make the sleeves. I printed the word “POPCORN” inside of an oval onto address labels. This part was kinda crappy…I hand cut all the ovals out. Then stick the Popcorn label onto each sleeve. With transparent tape, tape together the sleeve just tight enough that a cupcake sits in it without falling through. I strongly suggest cutting the marshmallows up in advance! For 48 cupcakes, it took almost 3 bags of mini-marshmallows. Many websites say to cut your marshmallows all the way through and smash them back together into random shapes. Turns out if you use FRESH mini-marshmallows and cut a “+” sign into one of the flat sides of the marshmallow (cutting halfway through; NOT all the way through), the four pieces will poof out and it will look like popcorn! I made normal size cupcakes and it took approximately 35 cut-up marshmallows for each cupcake. The white icing is a great filler for the gaps between the marshmallows. To create the buttered look, I added yellow food coloring to a small amount of water. With a pastry brush, I lightly brushed the yellow water over the marshmallows (don’t soak them, just dab on a very small amount of colored water). Everyone loved the cupcakes! Total cost: approximately $14 for 48 cupcakes (22 cents per sheet of scrapbook paper x 10 ~ 1/2 off at Hobby Lobby, $1.50 for each box of cake mix x 2 & for each tub of frosting x 2 & $1 a bag x 3 for generic mini-marshmallows). I had blank address labels and food coloring on hand already.
Spencer had his own special Elmo cake to smash up himself! This was super easy too (because if you haven’t figured it out, that’s how I roll). I baked 3 round cakes (again, Pillsbury Confetti) and layered the cakes. I smacked on a thick layer of white icing. With a flat spatula, I gently smacked the cake all over creating spikes in the frosting (to represent Elmo’s fur). It probably would make more sense to tint the icing with red food coloring gel but it takes just way too long to blend it all together. It just seems like you have to stir and stir and stir and stir and stir for hours to fully blend in food coloring. My lazy self was very happy to find they have this food color spray paint out now! 1 can of the red stuff was more than enough to coat the cake in red (found at Michael’s in the baking section)! I reserved some of the white icing to make two mounds of white frosting for his eyeballs. I also reserved a mound of icing for his nose which I reluctantly tinted with food color gel to make the orange (I really hate tinting frosting, can you tell?). Michael’s also has this too cool fondant thing going on! One large sheet of black fondant that is thinly rolled (less than $5) was what I used to cut out a 1/2 circle for his mouth, the 2 tiny circles for his pupils and the straight trim at the bottom of the cake. Hint: I used the 3/4″ circle paper-cutter to punch out the pupil circles! The first picture was taken shortly after applying the black fondant. After a few hours, the moisture in the icing softened the black giving it a more “icing” texture and less of a flat-black-I-stuck-a-piece-of-construction-paper-on-a-cake-look (as you can see on the next two cake photos). Spencer loved his special cake! Total cost for the cake: approximately $15 ($1.50 for each cake mix x 2, $1.50 for each tub of frosting x 2, $4 for red food coloring spray paint & $5 for one sheet of black fondant).
We also wore our family Captain America tie-dye shirts to Spencer’s party! How we tie-dyed the shirts is for another day! Spencer’s Sesame Street Bash was a HUGE success!
Our UPcycled Handicap-accessible Pallet Garden
I love planting but my PH makes it very hard to get up and down…gardening is harder than you ever think it can be when you are physically challenged. I’ve learned with my PH to accept that there are just somethings I just won’t be able to do and every year as the disease progresses, there are more things to add to this dreaded list. I added gardening to this list a few years back.
But don’t despair!
I am blessed with an amazing husband who finds creative ways to ensure I still continue to live life to the fullest! Our weekend warrior project was an UPcycled Handicap-accessible Pallet Garden. We used different ideas from various sources and came up with our own version of a pallet garden!
Total cost was approximately $30.00 ($16.00 of which was for the plants)!
So this is how we did it:
The hubby, Steve, brought home 2 reclaimed pallets. I found poster paint left over from a prior craft project with our youngest son, Spencer, in my craft supplies. Using a cheap foam brush, I painted what plants each row would have.
Next, Steve flipped over the pallet (after the paint was dry) and began to attach fabric-weed-preventer-black-cover-thingy…ok, so I don’t know exactly what this stuff is called, lol. Normally it is put on top of a garden to prevent weeds from popping up. The fabric-weed-preventer-black-cover-thingy was used to cover the holes and sides up on the pallet so that the dirt doesn’t fall out. The really great thing was that it was fabric so this allows for water drainage. Steve tacked down the fabric in various spots on the back of the pallet. Then he flipped the pallet over.
You can see that Steve and our oldest son, Stevie, folded over the edges and attached it to the wood frame of the pallet (going all the way up the sides). Yep, we just named our oldest after his daddy…now that he is a teenager, it really sucks calling “Steve” out in the house because both of them answer…actually it isn’t that bad now is it? I would suggest using a staple gun to attach the fabric but the hubby had some old nails he wanted to recycle into the project so our fabric-weed-preventer-black-cover-thingy was tacked onto the wood with good ol’ hammer & nails.
The last 2 open slotted areas will be the 2 rows of tomatoes we will plant. Because tomato plants get tall and heavy, the hubby is attaching a twine support system. In the second to last slate, Steve drilled .25″ holes approximately every 4-5 inches…perfection is not necessary for this project. He drilled the holes all the way across.
Yes, the picture is dark because, well…we got caught up watching Cougar Town on our DVR and lost track of time, lol. Steve took a piece of wood that was 2×3″ and 8′ long. Is it really 2×3″? I don’t know and I don’t think anyone at any hardware store does either, lol. Whenever wood says it is 1×4 or 2×4….actually measure it…you will find it is not the size it says. I really don’t get that? Anyways, he took the wood and cut approximately a 4′ section (he eye-balled it) and then took the remainder 4′ section and cut it in half. He then laid the 4′ piece of wood on the edge of the pallet slate that was drilled with holes. He then marked where he needed to drill the holes on the 4′ wood piece to match. So out comes the power drill and he drills again. I think all men love their power tools, don’t you? After the holes were drilled, he nailed the 4′ piece of wood on top of the 2′ pieces of wood creating an upside down “U”. Next, he hammered the 2′ wood pieces to the side of the pallet so that the holes in the slate were directly below the holes in the 4′ piece of wood. Tying 4 knots to anchor the nylon twine, Steve began stringing the twine through the bottom, through the top, over the top, down the top, down through the bottom, across the bottom, up the bottom…repeat, repeat, repeat several times over until the end is reached. In hindsight, the knot should have been on top because the last hole ended up being on the bottom. It was impossible to tie a knot underneath since the sides were already covered with weed fabric and you couldn’t get your hands in their to tie it taut. You can see in the following pictures how we resolved this issue in our own tacky way.
Steve found a perfect spot for my garden and then used cement blocks to elevate the garden for me. My PH makes it hard for me to bend over, get down and get up…yep, PH sucks. Anyways, he then used another recycled pallet on top of the cement blocks to further elevate my garden. Since we used a fairly thin fabric-weed-preventer-black-cover-thingy, Steve wanted to give it more support to prevent the 240lbs of dirt from falling through. Last year our awning on our pop-up tent went kaput so Steve poked holes in it and laid it between the two pallets. Slowly he added 6 – 40lb bags of cheap ol’ soil into the slate openings shoving the dirt into all the corners. Oh no! All my pretty artwork is covered in dirt! After throwing a fit that would rival our 2 year old’s tantrums, Steve assured me my immaculate letters would not be harmed by all the dirt. After 17 years, I guess I have to trust him…
Now came the fun part! We planted, okay, Steve planted (& I directed) the veggies into their designated rows. After all the veggies were planted, Steve filled in any shallow areas with more dirt.
Then it was time to give those plants their much wanted water while also spray-cleaning the dirt off of the slates!
In this pic you can see the cement blocks and patio pieces used to elevate my garden up approximately 2 feet from the ground! Nope not necessarily pretty…but I wasn’t trying to get published in Landscape Digest. Practicality was the key. Raising it up a couple feet makes it possible for me to garden. What a difference this makes for someone with PH! Two feet may not seem like much but let’s all remember I’m just over 5′ tall, lol (Ok, 5’2″…ok, ok, ok, 5 feet & 1-1/2 inches…so it’s way ok I round up to 5’2″)!
So our Upcycled, Handicap-accessible Garden is complete & I LOVE IT! I’ll be sure to post a pic when the plants start growing in and veggies begin to appear! At the end of summer, we will cut the front fabric and dump the soil into our wheelbarrow. We can reuse the soil next year in another pallet garden. The pallet wood will then be broken up for a good ol’ campfire. Isn’t recycling just grand?! Hope you enjoyed our weekend warrior project!
