Archive | June 2013

Strawberry Cream Pie II

A few days ago, I posted a recipe for Strawberry Cream Pie. It is my favorite pie now! The Strawberry Cream Pie recipe is aesthetically pleasing as it is tasty (see the photo above and say, “Mmmmmmmm” for a few minutes)! But now it’s time to get real. The strawberries on top along with the drizzled chocolate wasn’t easy to cut into. It sure is a purdy pie but I want to be able to cut me a slice with my strawberries and chocolate intact…I don’t want it going to the next slice! Obviously, I don’t share very well, lol!

I remade the pie however this time made it more realistic. The chocolate is coated on the bottom, the strawberries chunked throughout the cream center and I used an already made shortbread crust. It was easier to cut slices of pie out and easier to make! Look at that sweet line of chocolate right above the crust, yummy! The best part of this recipe? There is no baking! Perfect for our hot summer days when you don’t dare turn the oven on! If you are making Strawberry Cream Pie to take to a gathering, then sure, make this VERSION so you look all master chef-like. But if you are keeping it real and within the family, then make life easier and use this version!

Printable Recipe: Strawberry Cream Pie II

Ingredients:

  • 1 Keebler Ready Made Shortbread Crust (often next to their graham cracker crust)

  • Approximately 10 light cocoa Wilton candy melts

  • 1 pint heavy whipping cream

  • 2 – 8oz pkgs cream cheese, room temperature

  • 2/3 cup sugar

  • 2 teaspoons vanilla

  • 1 lb strawberries (washed, dried and chunked)

Directions:

Melt the light cocoa candy melts in a microwave-safe bowl. Melt in 30-second increments. Stir after each melt time. Continue to melt in increments until the chocolate is a smooth puddle.

Using a pastry brush, brush on a thin layer of chocolate onto the bottom of the ready-made shortbread crust. You can brush just the bottom or brush the bottom and sides. Allow chocolate to fully set-up (harden).

In a medium-sized bowl and using a mixer, beat the heavy whipping cream until it becomes thick and fluffy. This took approximately 7-10 minutes. In a large-sized bowl and using a mixer, beat the cream cheese till smooth. Add sugar and vanilla to cream cheese. Beat until well combined. Fold in the whipped cream into the cream cheese mix.

Wash, dry and chunk up the strawberries. Fold the strawberries into the cream cheese mix.

Dump the strawberries/cream cheese mix into the ready-made pie shell. It will be heaping way above the crust. Smooth the filling into a dome shape with the back of a spoon or spatula. Cover the pie with the plastic lid for at least 2 hours. Yes, the plastic lid did touch the top of the dome of cream but it barely stuck to it when I removed the lid to slice the pie up. I just laid the plastic lid on top, I did not smash it down and crimp the foil edges.

Slice with a sharp knife and serve. Keep leftovers refrigerated.

Strawberry Cream Pie

It is June here in Ohio which means strawberries! We have been on a serious strawberries kick lately. I whipped up this Strawberry Cream Pie and I do believe this is my favorite pie ever! So here goes…

Printable Recipe: Strawberry Cream Pie

Ingredients:

  • 1 pkg Keebler’s Plain Sandies

  • 4 tbsp melted margarine or butter

  • 1 pint heavy whipping cream

  • 2 – 8oz pkgs cream cheese, room temperature

  • 2/3 cup sugar

  • 2 teaspoons vanilla

  • 1 lb strawberries, washed, dried and sliced

  • Approximately 10 light cocoa Wilton candy melts

Directions:

Preheat oven to 350 degrees. Place Sandies in a gallon Ziploc and crush using a rolling pin to the side of a meat tenderizer. Place 2 cups of the crushed Sandies in a medium-sized bowl. Mix in the melted margarine or butter.

Firmly pack the bottom and sides of a deep pie dish. Bake for 12-15 minutes till light golden in color. Remove from oven and let cool completely.

In a medium-sized bowl and using a mixer, beat the heavy whipping cream until it becomes thick and fluffy. My sous chef, Spencer, helped out with this.

It does take some time to turn that liquid into fluffy goodness. Approximately 10 minutes with my hand mixer.

IMG_7341

In a large-sized bowl and using a mixer, beat the cream cheese till smooth. Add sugar and vanilla to cream cheese. Beat until well combined.

Fold in the whipped cream into the cream cheese mix.

Dump cream cheese/cream mix into the Sandies pie shell. Smooth with the back of a spoon or spatula.

Place sliced strawberries on top, overlapping each other.

Melt light cocoa candy melts in a microwave safe dish at 15 second increments until melted and smooth. Drizzle the melted chocolate over the strawberries. Cover the pie with plastic wrap and place in the fridge for at least 2 hours.

Slice and serve. Keep leftovers refrigerated. Looking for a more simple version of this pie with the same awesome flavor? Check out my Strawberry Cream Pie II recipe HERE!

Directions:

Chocolate Covered Strawberry Cake Pops

I know I said I wasn’t going to ever go back to the “dip, tap off excess candy melt and stick in styrofoam block” method of making cake balls…yep, said that 2 days ago, lol. Well, I couldn’t resist giving this a try!

What most folks don’t know is that Spencer’s Tank Cake for his Army-themed 4th birthday party was made with strawberry cake. There was a lot of excess strawberry cake leftover after Rhonda and I shaped out the tank. The hubby and kids devoured it. Spencer blew out the candle on his Tank Cake but was having too much fun at his party to slow down enough to eat any, lol! It’s been a long while since I had made a strawberry cake mix and I was pleasantly surprised by how yummy and moist it was. Then the wheels started turning…hmmmm, this would be awesome in a chocolate cake pop…Eureka! Chocolate Covered Strawberry Cake Pops were born!

I would love to tell you I make my cakes from scratch but um, no. Some people have mastered making cakes and who am I to mess with perfection? I am specifically talking about the dough boy himself over there at Pillsbury, and Mr. Hines, you know Duncan Hines, lol.

You need very few things to make these yummy treats:

  • Strawberry Cake Mix & all ingredients to make the cake per package directions (usually just water, eggs & oil – I used a Pillsbury Cake Mix)

  • Little more than 1/2 a tub of cream cheese frosting (I used Duncan Hines, it was on sale this week, lol)

  • 2 bags of Wilton light cocoa candy melts

  • at most 70 lollipop sticks

  • 1 Squeeze bottle filled with melted chocolate (you could use light cocoa, white or green colored candy melts)

  • Green sugar crystals

  • Styrofoam block

  • Red ribbon (optional)

Bake the strawberry cake in a 9×13″ pan following the package directions. Allow to cool completely.

Some folks will tell you to break up your cake into a large bowl. I personally don’t see the point in messing up another bowl to clean. I instead, crumble the cake in the pan it was baked in. Dollop on top of the crumbles a little over half of the tub of icing.

With gloved hands (this tends to get messy), smash the icing and cake over and over until you have an ooey, gooey ball of cake.

To ensure my cake pops are close to uniform in size, I use a one-inch cookie scoop to make balls of cake. I typically can get between 52-60 cake balls from a box of cake mix. I find the chocolate cake mixes typically make about 4 less than white or yellow cake mixes. Turns out this holds true for the strawberry cake mix, I had slightly less than normal amounts of cake balls. So just expect to make 50 cake balls out of one box and you will probably be happy every time you make them because there will be a few “extra”.

With your still gloved hand, take the scooped cake ball and roll it tightly into a ball. On one side of the ball, I rolled it a little tighter to get a coned shape effect. Gently shape the cone into a strawberry shape. When I get a package of strawberries, they are always a mix of big ones, slightly smaller ones and even way small ones.

No two strawberries are alike and neither were the cake balls I rolled out to look like strawberries. If you ask me, that was part of the charm of it.

Once all the cake balls are rolled out, place the tray in the fridge to help firm up the strawberry shapes. This usually takes only 10-15 minutes. While waiting, I get my candy melts melted down into a smooth, yummy puddle. I love, love, love my Wilton Candy Melter. It has 3 settings: Melt, Warm and Off. Once the candy is melted, you can switch the setting to Warm and it will keep the mini crockpot at the exact temperature needed to keep the candy melt smooth without burning it.

If my candy melt is thick, I combat this with adding a dollop of shortening. Some folks will tell you to add vegetable oil a teaspoon or less at a time. Well, I find that the oil never really blends with the candy melt and can just sit on top of the chocolate once it sets. Kinda yucky if you ask me. At least with shortening, it well become more of a solid and blends very nicely with the candy melts. If using the Wilton Candy Melter, be sure to turn the dial to Warm after you candy melts are all melty. If you leave it on high, you can actually burn the chocolate and it will seize up. Tastes downright yucky when that happens.

Once the candy melts are all smooth, remove the strawberry-shaped cake balls from the fridge. Dip the lollipop sticks about a fourth inch into the chocolate. Insert the lollipop stick into the bottom of the strawberry-shaped cake ball. When you place a cake pop on a cookie sheet, the weight of the cake ball will create a flattened area. This is where you want to insert the lollipop stick. When making rounded cake pops this is important. Inserting the stick on that flat surface ensures the top of the cake pop remains rounded. Of course, if making the cake pops upside down, you will insert the lollipop stick into the rounded top of the cake ball (see HERE).

Allow the candy melt on the lollipop sticks to set (harden).

While waiting for the lollipop sticks to harden, add the second bag of candy melts directly into the melter.

I try to create a deep well of chocolate bliss so that I am able to dip straight down and cover the cake ball all the way to the lollipop stick all in one dip.

Allow the excess chocolate to drizzle and drip off the cake pop for a few seconds. I often will gently swirl the cake pop in a circular motion to get the excess candy melt off. Some folks tell you to gently tap the side of the container to knock off the excess candy melt while also rolling the lollipop stick. Yada, yada, yada…too long and I always end with Cake Pop Down syndrome right into my puddle of chocolate because I knocked the cake ball right off the dang lollipop stick. If you rolled tight enough balls and ensured your chocolate is thinned out enough, they don’t fall off your lollipop stick. Just gently swirl the cake pop directly upside down to get the excess candy melt off.

Once all that will drip off has dripped off, place the lollipop stick upright into the styrofoam block. I should add that you should prepare the styrofoam block before even baking your cake. Leave the plastic on the styrofoam block, this helps to make them reusable for several more cake pop adventures. When candy melt drips down, you can just wipe it off the plastic. Take a lollipop stick and puncture the styrofoam to create “pre-drilled holes” for the cake pops to sit in. Make sure your puncture marks are about 1.25″ apart. This ensures your 1″ cake pops don’t touch each other while setting up and keeping it this distance allows you get as many cake pops on one block of sytrofoam as possible.

Allow the candy melt to completely harden before handling. It probably would have made sense to use the light cocoa candy melts to make the leaves. That way if the green sugar crystals didn’t fully cover the melted chocolate, it wouldn’t be so obvious as the melted chocolate would be the same color as the cake pop itself. Make sense? Probably not, lol. Just nod your head and agree with me. Of course, I am not one to waste. All of my squeeze bottles already had candy melts in them. I had used them in recent baking. When there is leftover in my squeeze bottle, I just let it harden and cover the tip. When I need it again, I just put the squeeze bottle in the microwave and melt down the candy melt. I will do this only a couple of times in a two week period and then I just end up heating up the candy melt and tossing it out for fresh candy melts. Those squeeze bottles are a God-sent. Easy to fill, easy to use and easy to clean. You wouldn’t think so but it really is. To fill, put in the hardened candy melt chips right into the bottle. They fit beautifully into the opening. I will fill it to the brim and microwave it for one minute on high. I give the bottle a couple good squeezes to mix it up and heat a little longer (in 15 second increments) until the candy is melted into a smooth puddle. Just know that although you filled your squeeze bottle to the brim with hard candy melt chips, that the volume when melted will result in a squeeze bottle half full. When using the squeeze bottle, the candy melt does begin to harden up after several minutes. I just pop it in the microwave for 15-25 seconds to make it melty smooth again. When cleaning out the squeeze bottle, I heat up the candy melt again in the microwave. I squeeze it out into something in the trash, either a discarded can or cardboard box. Within minutes it is completely hardened. Then I take my tongs and hold the squeeze bottle. I blast it with super hot water using my kitchen sprayer. You need the tongs because the plastic is thin on the squeeze bottle and you can feel that super hot water being sprayed inside of it. It only takes seconds to blast out all the melted candy from the bottle and the lid. I put a drop of dish soap in and blast that soap around with the hot water. Rinse several times and tadah, clean and ready squeeze bottle. Just know that water and candy melts don’t mix well. Water can make the candy seize and harden in an ugly way. So if using squeeze bottles that were recently cleaned, make sure they are completely dry before trying to melt candy in them.

With the melted candy in the squeeze bottle (I used white), squeeze out a thin leaf design around the lollipop stick.

Quickly sprinkle with green sugar crystrals. The sugar crystals only stick to the melted candy. Place the chocolate strawberry cake pop back into the styrofoam block until the green leaves are hardened and set.

Because I am anal retentive, I also tied red ribbons around the lollipop stick because, well…it looked purdy!

Everyone who has tried my Chocolate Covered Strawberry Cake Pops has L-O-V-E-D them! This includes our cutie patootie, Spencer! Need more cake pop ideas? Check out my Graduation Cake Pops, Snowman Cake Pops, Nothing But Net Basketball Cake Pops, Camo Cake Pops and Baseball Cake Pops.

Spencer’s Army Birthday Party

This past weekend, we celebrated Spencer’s 4th birthday Army style! It was a lot of fun putting it together and creating unique Army ideas for his party. I thought I’d go ahead and share how I made each of his Army pieces.

I made Army cake pops! I’ve posted several times directions on how to make cake pops (HERE, HERE and HERE). I have to tell you, I don’t think I will ever go back to the dip, tap off the excess and stick it in a styrofoam block method. I love the simplicity of the mini cupcake liners! More importantly, it takes half the time to make them as I am not trying to create this perfect round ball with a perfectly even layer of chocolate.

I dip the cake pop and pull it straight up. I let what chocolate will drip off drip for only 1-2 seconds. Then I stick the cake pop into the mini cupcake liner. Tadah, done! I do have a few tips on how to make a perfect mini cupcake liner cake pop. First off, Use a mini cupcake pan to help keep the shape of the mini cupcake liner. Secondly, I learned the hard way that the shear weight of the cake pop pushes the chocolate out on the bottom to the point the cake itself is exposed. To combat this, I either use a spoon to drop a glob of melted chocolate into the center of mini cupcake liner or I use a squeeze bottle full of melted chocolate to create a glob. It doesn’t take much, maybe 1/2 a teaspoon-size of a glob. I wait until the glob sets (hardens) before gently pushing a dipped cake pop on top of the glob. The melted chocolate from the recently dipped cake pop will slightly melt the glob in the cupcake liner and it will form a smooth bottom of chocolate that completely covers the cake pop. Lastly, gently push the cake pop straight down to ensure the lollipop stick is perpendicular to your counter or table. Sometimes when I let go, I can see the lollipop stick is tilting. I gently straighten it the best I can and hold it for a few seconds until the chocolate begins to set. Nothing is worse than a lopsided cake pop!

I love the look of the upside down cake pops in mini cupcake liners! Cupcake liners come in so many patterns and colors! Also, I can create unique and personalized flags or lollipop stick toppers (like the #4 star in the above picture). If creating flags or toppers, remember to create a design that is double-sided. Also, there are so many different ribbons you can use! Different designs, colors, width and material! I found the camo ribbon at JoAnn’s. For his camo cake pops, I made all chocolate cake pops dipped in chocolate. Before the chocolate set, I sprinkled the cake pops with green sugar crystals. These cake pops were a huge success and were long gone way before the party ended! Cake pops are really the way to go. You don’t need to buy dessert plates or forks and you don’t need to serve ice cream with it. It’s the perfect dessert!

The camo cupcakes were really fun to make! I can’t claim credit for the original design. It was something I found on Pinterest. I did however do it differently in a way that was easier for me.

I bought chocolate and white cake mix. I mixed up each mix in separate bowls. I then got a 3rd bowl out and took about a cup of the white cake batter and put it in the bowl. Then I added about 1/3 cup of the chocolate to the white to create a tan color. For the remainder of the white cake batter, I added Wilton Green Moss gel food coloring and mixed it up into a pretty green color. I transferred the chocolate, tan and green batter into their own gallon Ziploc bags. I snipped the corner of each bag and with the help of the hubby, we squirted out small globs in random fashion into the camo cupcake liners. I had one bag and my husband had the other 2 bags (one bag in each hand). We filled the cupcake liners halfway full and baked them according to the package directions.

The camo cupcake liners were Wilton brand and I found them at Walmart. To create the camo frosting, I used one store-bought tub of chocolate and white icing. I left the chocolate icing color the same. With the white icing, I split the icing in half in different bowls. I tinted one half of the white icing with Wilton Green Moss gel food coloring to create the green color. So I ended up with brown, white and green frosting to decorate with. Check out this video below I had found on Pinterest on how to easily fill and use a pastry bag for icing cupcakes.

Instead of just using one color of icing in plastic wrap, I used the three colors in smaller portions wrapped in plastic wrap. Same concept, I rolled and twisted the three different colors and pulled them through the coupler. I snipped the plastic and then added the tip and ring. Quick and simple with very little mess!

The Army men I bought at Dollar Tree (48 men for $1) and I also found at the Dollar Tree the American flag picks.

The flags actually came with American designed cupcake liners. I kept the liners for another day and just used the flags.

They turned out really cute!

To make the tank cake, I made two cakes in 9×13 pans. I took one pan and cut the cake in half. I placed one half on top of the other. With the other cake, I cut out a smaller rectangle with curved corners for the top of the tank (yep, there was a lot of unused cake from the 2nd pan that the hubby and kids gobbled up).

For the gun, I dipped a pretzel rod in black candy melt and after the candy melt was set, I stuck it right into the cake. I used Oreos for the wheels and a Hershey candy bar broken (at the score marks) for the tire treads.

The USA and stars were made from yellow chocolate that I piped onto wax paper taped to a cookie sheet. I placed the cookie sheet in the freezer to harden up the chocolate. For the flags, I used Word and Photoshop CS5 to create a double-sided design. I then used double-sided tape to wrap the flag around shish kabob sticks.

To get the green tank color, I used Wilton green food spray paint. It turned out awesome! Clearly home-made and personalized for our son!

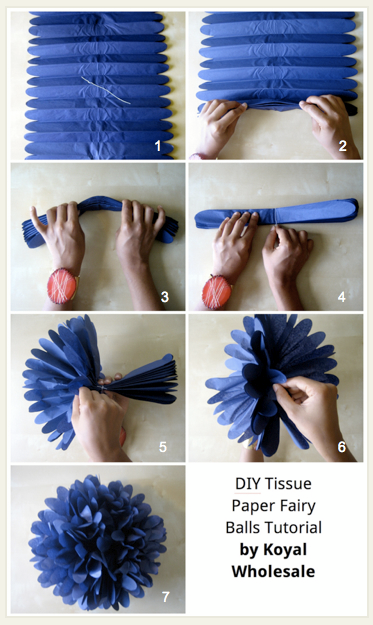
I love tissue balls for decoration! They are striking, simple to make, easy to customize and cheap! I am always shocked at how much folks charge for tissue balls. I bought green, dark brown, light brown and beige packages of 10 tissue papers each at Hobby Lobby for .99 cents each. I then made 16 tissue balls from that. So for less than $4.00, I had these awesome 7-8 inch tissue balls! I love using the tissue paper from Hobby Lobby. For one, they are always only $1.00! Hobby Lobby has a decent selection of colors also. More importantly, they are already perfectly square. Usually when you buy tissue paper, it is more of a rectangular shape but to create round tissue balls, the tissue paper has to be square. I separated all the sheets from the 4 different colors. I then layered the colors in a repeating pattern into equal piles of 10 sheets each (yes, some balls had extra sheets of one color…I had 4 colors that contained 10 sheets each so some piles were bound to have 1-2 more sheets of the same color). Then I took one pile and cut it into even fourths (4 squares). I repeated this with the other 3 piles. You end up with 16 different square piles of tissue paper.

Untitled

There are tons of folks who have blogged how to make these tissue balls. No sense in recreating the wheel, so I posted a pic above of how easy it is to do from Koyal Wholesale. Simple concept, again make sure your tissues (between 8-10 sheets) are perfectly square. Fold in accordion fashion. I staple the folds right in the middle. I then tie my string (about 2.5 feet in length so they can hang down from the ceiling) around the fold in the center. I staple the folds once again making sure I stapled over the string knot to keep it centered. Then round off the edges with scissors. Fluff and done! Easy peasy and very striking!

The home-made paratroopers were lots of fun to make! The hubby gathered some cardboard boxes at work. He took a 8-inch plate and outlined them onto the cardboard. He cut out his perfect circles. He then took that same plate and traced out a circle on regular copy paper. He cut out the copy paper circle. He folded the copy paper circle in half and traced the halfway line on the cardboard circle. This ensured his circles were cut perfectly in half. He then folded the semi-circle copy paper in half again. He used this guide to create the marks to cut the cardboard halves. He cut down from the top halfway on one half circle and then cut up from the bottom halfway on the other half circle. That way the pieces can be put together like a puzzle piece to create the 2D effect (see the picture below to get an idea of what I meant by all the cuts, you can see the cardboard parachutes behind Spencer).

Spencer helped me paint the cardboard half circles dark green, light green and yellow. He had a blast! After they were dry, I put them together. I bought slightly larger Army men from Family Dollar. Using leftover white crochet thread, I tied two long, even pieces of thread around the Army man. Using a needle, I threaded the crochet thread through the eye and punctured the cardboard with the needle. Tying the Army man up to the 4 corners of the 2D “parachute” created the paratrooper decoration. I also added a long piece of string to the top so that they could hang down from the ceiling. They really looked awesome hanging from the ceiling!

Instead of using tablecloths to decorate the tables, we opted for putting a functional decoration on the table. The MRE boxes were so simple! The hubby again got boxes from work. He made sure he got the same sized boxes. I bought brown postal wrapping paper at Dollar Tree to wrap each of the boxes in. Using a permanent black ink marker, I hand-wrote MRE on each of the boxes. We just filled the boxes up with microwave popcorn. Something for our guests to nibble on. Folks loved it!

The CAMP PACK, MESS HALL, COMMISSARY and HEADQUARTERS signs were simple to do. The MESS HALL sign hung above the food tables. The COMMISSARY sign hung above the table of Rations (aka goodie bags). The HEADQUARTERS sign hung above the table where all his gifts were placed. They turned out really cute! I bought poster foam board from Michaels. The hubby then cut them down. It didn’t matter how rough the edges were because I told him in advance that I would be wrapping the edges in camo duct tape I found at Meijers. Michael’s had paint on sale for .33 cents each.

I bought green and tan. Using a foam brush, I painted all the words onto the cut foam board.

We also added a path of signs leading up to the shelter. We had 6 signs on the path with each saying the following:

  • SOUND

  • OFF

  • 1

  • 2

  • 3

  • SPENCER IS 4

Folks loved the path signs and the signs made it clear they were heading to an Army-themed party!

Spencer’s RATIONS bag (aka goodie bags) were fun to put together. First off, visit  your local Army recruiting office. The fine soldiers there were kind enough to give me 50 Army bumper stickers, 50 Army square stickers and 24 Army pencils for Spencer’s Army themed party! Sure, you can find lots of Army goodie bags/boxes online. I’m a money cruncher, if I can make it cheaper, then I make it!

I found clear cellophane bags at Family Dollar. I needed a lager bag size to ensure all the stuff I put into the goodie bag would fit (specifically his 4×6 thank you cards that I printed for .05 cents each at Walgreens)! This is what went into Spencer’s RATIONS bags: 4×6 collage thank you picture, Army bumper sticker (folded in half), Army square sticker, Army bubbles, 2 Army men, one piece of Twizzler, one Smarties roll of candy and a dog tag of Spencer’s Army picture. The Army bubbles I purchased at the Dollar Tree. They came 8 in a package for only $1.00! You can find them in their wedding section. I used Word to create a table. I put in the saying I wanted to personalize his bubble bottles. I then took them to FedEx Kinkos and they printed them on adhesive paper for only $1.49 a sheet. Sure I could have printed it at home but anytime I print something with lots of color, I just hop on over to FedEx Kinkos, no sense in wasting my expensive ink! I also sized down Spencer’s Army photo to 1×2″ size and put several pics on one sheet of paper (using Word). I also had FedEx Kinko’s print this on adhesive paper. What’s also nice about FedEx Kinkos, is that they let you use their heavy-duty paper-cutter in their self-serve center. I was able to cut up Spencer’s pictures and bubble labels quickly and easily!

I wanted to stay with the Army theme so I printed the star with the #4 and RATIONS on 4×6 photo paper that I had gotten free the last time I bought ink for my printer. I put the rations card in front and Spencer’s Thank You collage photo in the back. I then put all the goodies between them. I hole-punched the baggie and tied on green and brown ribbon. The best thing about the RATIONS was the dog tag key chains I had made. I had purchased 1×2″ dog tags punched out of cardstock from HERE on Etsy. I then used Photoshop CS5 to crop my picture into a 1×2″ rectangle. I pasted several of the pic onto a Word document so that when FedEx Kinkos printed it for me on adhesive paper, they printed several on one sheet. Again, I used FedEx Kinkos’ heavy duty paper-cutter to cut his pictures into 1×2″ rectangles. I had a corner curve punch I used that lined up perfectly with the dog tags I had purchased. I then just stuck his picture onto the cardstock dog tag. To ensure the key chain was sturdy, I applied 3 coats of Mod Podge to both sides of the key chain. I also purchased the ball chain key chain from Etsy HERE. Before knotting the brown and green ribbon, I attached Spencer’s “dog tag”. Folks loved it and now our guests have a keepsake photo from when Spencer turned 4-years-old!

Last but not least, Steve and I made our yearly family shirts! We have for the past couple of years made matching shirts to wear at Spencer’s birthday party. It’s fun and makes it easy to find one of us during the party. Yes, Spencer is a bit teary-eyed in the above picture. He got nailed with a water balloon, lol! Turns out he likes throwing them but doesn’t like getting hit with one! He was fine once we took his soaked shirt off and turned him loose with a water gun. He fired away at all of his guests, lol!

Being Army themed, I had searched low and high for an affordable camo t-shirt. Turns out camo isn’t that cheap! LOL I went to Walmart and bought gray t-shirts for less than $4.00 each. I headed over to the fabric section and was going to get some Heat and Bond Adhesive. It is a double-sided adhesive that you iron down on fabric. You can then cut out your desired shape. Peel the backing off and then iron the fabric on to your desired fabric. Heat and Bond is fun to use if you don’t have a fancy embroidery machine.

I figured I would buy camo fabric and cut out my designs to place on our gray shirts. Hanging right beside the Heat and Bond were patches. The patches already had adhesive applied. They were 5×7″ in size and woah is me, they had camo patches! The package contained 2 – 5×7″ camo patches. I bought 4 of them and they were only $1.77 each!

I used one 5×7 to cute out a large # 4. How’d I make it so straight? Well, I used Word and used the feature Word Art to create a large # 4. I picked a font with very little detail so that the cutting wouldn’t be difficult. I believe I used Arial font. I printed the number and flipped it over onto the back of the camo patch. I traced around it with a  pen and cut it out. Remember to turn your number or letters backwards when you are tracing them on to the back of your patch or fabric! Otherwise, the letters will be backwards when you go to iron them down (yep, learned that the hard way…thankfully I hadn’t cut the #4 out yet). For the second patch in each package, I made the letters for the back of our shirts. I used Word again to create templates for the letters (using Word Art). I made sure the letters were roughly the same height and width for all the words. It was tedious to cut all the letters out but I just sat in front of the TV and took my time. The large #4 was ironed on (following the package directions) to the front of all of our shirts. On the back, we had different rankings! Our oldest son’s back of the shirt said PRIVATE. The hubby’s said SERGEANT. Mine said CAPTAIN.

Lastly, Spencer’s said GENERAL because let’s be honest, he is in complete control of this entire family with his captivating smile and contagious laughter! The hubby used a yard stick to ensure the letters were evenly spaced and straight before ironing them in place. The shirts turned out really cute and now we have our family’s summer shirts for 2013 that we will wear when we go to fairs, parks, etc. all for less than $7.00 a shirt!

All in all, I was able to keep the cost low for his Army party by putting in some elbow grease. I didn’t want to buy any commercial Army birthday decorations. I wanted to try to make everything. It was coming down to the wire and I still needed to make a Happy Birthday banner. While at Hobby Lobby, I found what I thought to be an awesome camo Happy Birthday banner for only $3.99 and one package of Army themed cut-outs. I decided to go ahead and get it. I had already worked so hard on making and creating everything else so I splurged and bought the banner and cut-outs. Notice anything off about the banner in the above picture? Yep, the letters were all backwards. No, it wasn’t a “turn the banner around” issue, literally, every letter was in the wrong place! It was double-sided and the backside was backwards as well, lol! I was shocked! We hung it up anyways and it was funny how many folks didn’t even notice, lol! Just goes to show, if you want something done right, sometimes you just got to do it yourself! Here’s to all the DIYers out there! You rock!

Jealous of all the bright colors…

ribbons_awareness

The days where I am downright angry about having pulmonary hypertension (PH) are far and few between. But I am human and I do have those days. Guess today is one of them days. This article in Psychology Today explains why I get a little jealous over awareness of certain diseases and disorders. So many have come together to raise awareness and funding. With funding, solid treatment options have emerged and for some diseases, a cure has been found. There’s not enough of us to bring PH to the forefront. Research is slow and a cure is no where in sight. Don’t get me wrong, the Pulmonary Hypertension Association (PHA) has done some great stuff. If you have PH, you know all about the PHA. If you don’t have PH or know someone personally who has PH, you most likely know crap about the disease let alone ever even heard of PH. I read somewhere in the gazillion journals, articles, blogs, websites, pamphlets I’ve researched that people die 3 years after diagnosis without treatment and those with treatment often die 5 years after diagnosis. 8 years into our PHight and very few advancements have been made. I’ve done my very best to share our story to raise awareness but I know it’s not enough for it to make a difference in my lifetime. I can only pray it is enough to make a difference in the next mother, daughter, sister or friend diagnosed with PH (yes, men get it too, but it is more likely to happen to women). 1-2 in a million are diagnosed with primary PH (my culprit disease) so there’s just not enough of us but I think we still matter and are worth the funding and research. Or at least with those kind of odds, let me also win the lottery (then I’ll fund the crap out of some kickass research). Yep, I’m jealous just a little bit of all the pink, yellow, red and other brightly colored ribbons . . . PH is stuck with the color periwinkle. What the hell color is that? And that color is also used by other diseases and disorders. I’m really embarrassed to admit this, but I am a little bit jealous of all the other colors . . .

we’ll just keep on PHighting anyways.

Want to help raise awareness? Tell 5 people about PH today. Then ask them each to tell 5 of their friends about PH. Then tell them to tell their 5 friends to each tell 5 people about PH, so on and so on. Just because not everyone gets PH doesn’t mean you shouldn’t know what PH is. Spread the word. Make a difference.

Graduation Cake Pops

This past weekend, one of our dearest friends’ daughter, Jodi, graduated from Groveport Madison High School. She made a special request to have cake pops for her graduation party. I had a lot of fun creating a unique design. While I worked on making confectionary joy, her mom, Beth, worked on building a unique tower to display the cake pops. Beth cut up scrap wood she had that were 1 x 4s into different lengths and stacked them in a very unique pyramid pattern. Half the wood was white and the other half black. The cake pop tower turned out awesome!

I have posted how to make cake pops on my blog before HERE, HERE and HERE. Check out those links for specific directions. I don’t use those “cake pop pans,” instead they are all rolled by hand. I take great pride in making yummy cake pops and they always get rave reviews. Seriously though, you really can’t screw them up. They are simple to make, it just takes a lot of time and patience.

Since her graduation party was outdoors and the weather had been warming up, I decided to make the cake pops upside down. I am so glad I did! If I would have made them with the cake ball on top (like a lollipop), they most certainly would have turned into the ball at Times Square on New Year’s Eve! The balls would have dropped all the way to the bottom of the stick after softening up in the warm weather!

I placed mini cupcake liners in my mini cupcake pan. Instead of sticking the dipped cake ball into my styrofoam block to set up, I instead placed the freshly dipped cake ball (on the stick) into the mini cupcake liner. I let the candy “set up” in the mini cupcake pan. Once the candy had hardened, I melted some more white candy melts and poured it into a Wilton squeeze bottle. I drizzled the melted candy on top and then sprinkled red sugar crystals on top. The red crystals only stuck to the freshly melted candy. I turned the mini muffin liner upside down and let the excess red crystals fall back into a bowl. The school colors are black and red and I wanted the cake pops to represent that. The designer mini cupcake liners were purchased at Michaels.

While at Michaels, I picked up some red scrapbook paper with white polka dots. I printed out Jodi’s name & class of 2013 along with “Way 2 Go” in a table. I then hand cut out the mini flags. I printed it so that I could fold it over and there would be writing on both sides of the mini flags. I used double-sided tape to tape the flag sides to each other around the lollipop stick and then cut a little “V” out of the edge. HERE is the Word table I used. I changed the table’s lines to a light gray color so that it wouldn’t show up as much if I should happen to not cut in a straight line (I’m known for doing that, lol). You can just highlight what was typed and type over it using your own sayings/words in its place. They really turned out super cute!

Just also wanted to add a cute idea on how to display a graduation cap. I took a garden ornament to use as the cap holder. It is a cement looking (probably made of plaster) ball on a large candle stick of sorts. I had purchased it a year or so ago to use as my prop to display the Mickey Mouse crochet hats I make. The graduation cap holder was placed on the table with her photos and other mementos from high school! This was an adorable way to display her graduation cap!

Way to go Jodi!

Best wishes at Ohio University this coming fall!

Update:

I was asked to make more grad cake pops for another Class of 2013 graduate. Dareyl Hamlet is a great kid and I was humbled by his request. I whipped out these ones below for his graduation party! Good luck Dareyl at Shawnee State University!

Update 2:

Made more cake pops for our nephew, Tyler! Tyler graduated from Plymouth High School!